How to Give Subcutaneous Fluids to Dogs and Cats


When people are dehydrated, we have only two options for treatment—drink fluids or receive intravenous (IV) fluids. But pets have another option.
Many have looser skin than human beings, so they can receive hydration through subcutaneous (under the skin) fluids. This method is easier to administer and comes at a lower cost than IV fluids.
It’s common for vets, especially at emergency hospitals, to give subcutaneous fluids to help treat temporary dehydration for almost any reason. However, pets who are extremely lethargic and very dehydrated need IV fluids.
But what if your pet has a condition where you need to give subcutaneous fluids at home—without a vet around?
Why Do Some Pets Need Subcutaneous Fluids at Home?
Typically, a veterinarian would recommend for you to do subcutaneous fluids for your pet at home when they have a long-term illness that causes dehydration, such as:
- Kidney Disease
- Cancer
- Severe constipation
- Chronic vomiting and diarrhea
Pets with heart disease, edema, or those in oliguric kidney failure (not producing much or any urine), are not good candidates for subcutaneous fluids because of the danger of fluid overload.
What Is in Subcutaneous Fluids for Dogs and Cats?
Pets receiving subcutaneous fluids receive the same type of fluids as the IV fluids humans get. Most commonly, this is Lactated Ringer’s solution, which contains:
- Sodium and chloride (together, these make up salt)
- Potassium
- Calcium
- Lactate (a buffer to prevent the fluids from being too acidic)
Lactated Ringer’s is chosen because it does not sting when given under the skin. Occasionally, vets will choose other fluid types based on medical needs. Dextrose should not be given under the skin as it can cause infections.
Can Both Dogs and Cats Get Subcutaneous Fluids?
Subcutaneous fluids are easiest to give to cats due to their small size and large space between their skin and body wall. Dogs may also be candidates, but some dogs have skin that is tightly bound to their body wall. In these dogs, only small amounts of fluid can fit into a spot comfortably. It may take more than one injection to give them the full amount of fluid needed.
How to Give Subcutaneous Fluids to Dogs and Cats
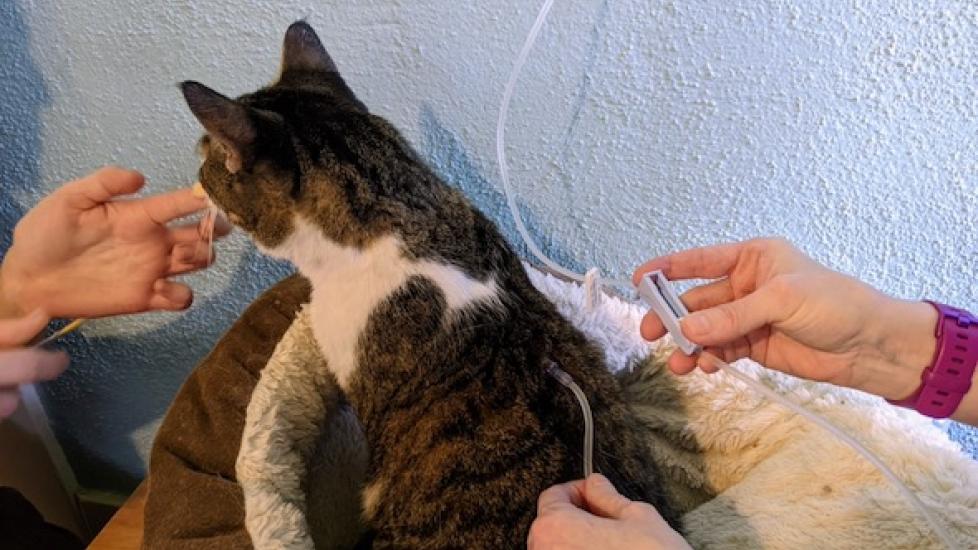
The setup for subcutaneous fluids is similar to IV fluids, except that the fluids are given through a needle under the skin on the pet’s back instead of through an IV catheter in the pet’s leg.
Every pet’s fluid needs are different based on the results of their physical examination, their weight, and their lab values. Your vet will instruct you as to how much fluid to administer and how often.
For most pets, subcutaneous fluids are given over the skin of the back, anywhere from the right and left shoulder blade to the right and left hip. Switch areas with each treatment so the fluids are not given in the same area each time.
Equipment List
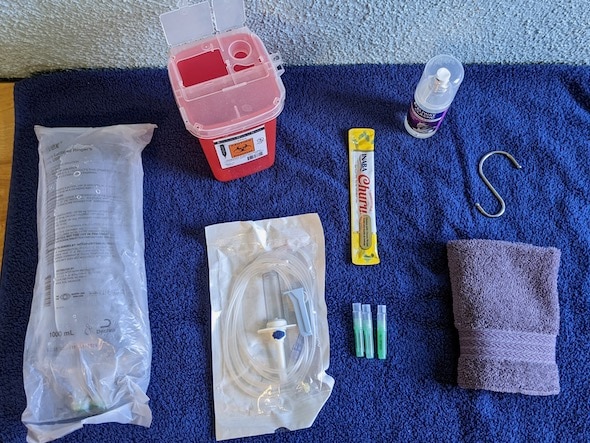
Bag of fluids (Lactated Ringer’s)
This will be prescribed by your vet, but here are some examples:
IV line (also called the IV set, infusion set, drip set, or administration set)
A longer IV line (>100 inches) is handy if the bag is going to be hung further from your pet or if your pet is wiggly and tends to move during the treatment:
Shorter lines (<100 inches) are needed for pets who will be on a table and no more than 2-3 feet from the bag:
- Primary IV set (y-site) 80-inch
- Jorvet infusion set 72-inch
- Jorvet infusion set (y-injection) 78-inch
- Baxter Interlink solution set (y-injection) 76-inch
Needles
Have at least 3 handy. These are also prescription items, but ask your vet about the gauge of needle you might need. A 20 g needle is more comfortable for a cat or small dog, but results in a bit slower flow. An 18 g needle is larger and leads to a faster flow of fluids for larger pets. These needles may also be used in smaller pets who won’t sit still for long. The needle stick is the part that hurts, so you may have to experiment with needle size to determine which your pet tolerates best.
Check with your vet about disposal of the sharps.
A Hook to Hang the Bag
The hook should hang preferably 2+ feet above the pet from a sturdy structure. For example:
- A shower curtain hook or clothes hanger hung from a shower curtain rod
- A curtain rod using a hook
- A towel hook
- A nail or picture hanger
- This deck hook can be attached to a sturdy railing or surface (desk, stair rail) to hold the fluid bag high.
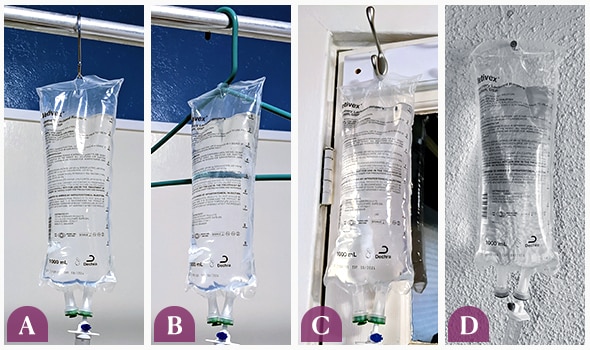
Options for hanging the fluid bag: a shower curtain hook (A) or clothes hanger (B) hung from a shower curtain rod, a towel hook (C), or a nail (D).
- Something to distract your pet, such as food (Churu is a cat favorite), their favorite brush or favorite person, or pheromone spray on their bed or towel.
- A clean washcloth to place on your pet’s back after the needle is removed.
Storage and Disposal of Fluids for Pets
The fluids should be stored at room temperature, not in the refrigerator. Cloudy fluids should not be used. Once a bag has been punctured by a needle or IV line, it should be discarded within 5-7 days.
Ask your vet about the best means of disposing of used needles. Some clinics will provide containers called “sharps containers.” Fluid bags and IV lines WITHOUT needles may be thrown away in the regular trash can.
Setting Up
- Wash your hands thoroughly.
- (Optional) Warm the fluids: Put the fluid bag inside two plastic zipper bags and place in a bowl of water that is 95-99° F. Remove the fluid bag once the bag feels like it is the same temperature as the water. Make sure the water does not get on the fluid bag if the IV line is already attached.
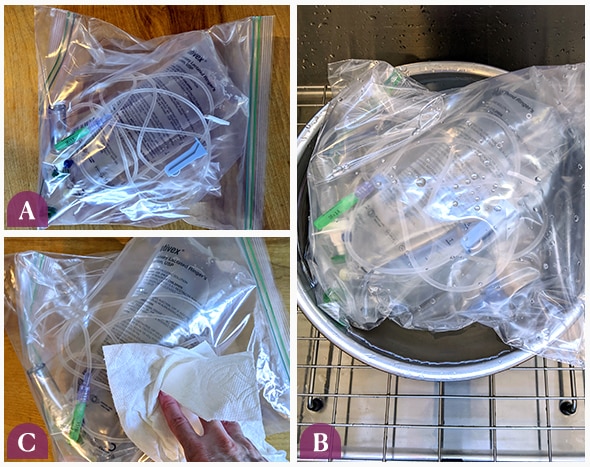
Put fluid bag inside two plastic zipper bags (A). Then place this in the bowl of warm water (B). Dry the outer zipper bag once you remove it from the water (C).
- If the fluid bag is new, tear off the plastic outer covering with your hands (not scissors).
- Pull out the plastic stopper from the spike port at the bottom of the bag.
- Remove the IV line from its wrapper.
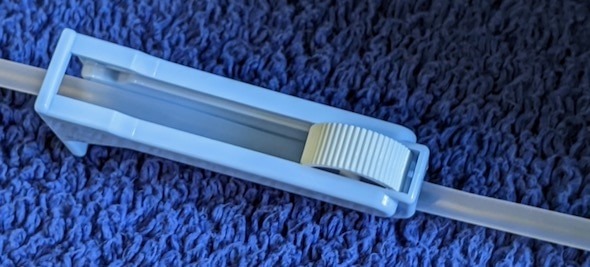
- Close one of the clamps on the IV line to prevent fluid from filling the whole line.
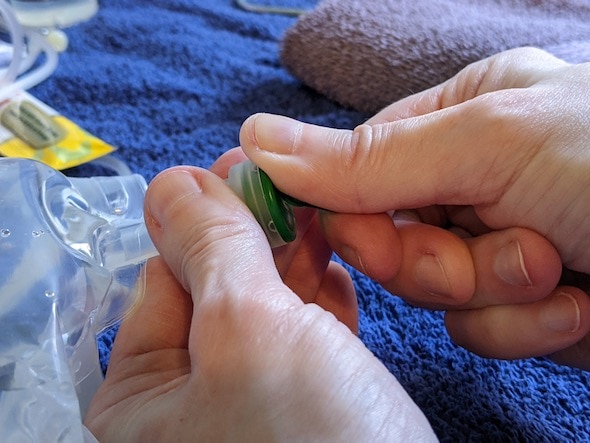
- Remove the plastic tip from the spike and place it inside the fluid bag where you removed the stopper (spike port). This will take some mild force to break the seal of the bag.
NOTE: It is important not to touch the plastic spike to anything but the spike port of the fluid bag. If you do accidentally touch it with your finger or any other surface, it is best to use another IV line, rather than potentially introducing bacteria into the fluids.

Remove the plastic tip (A) and insert tip into spike port of the bag (B), making sure you break the seal to fully insert the tip (C).
- Hang the bag.
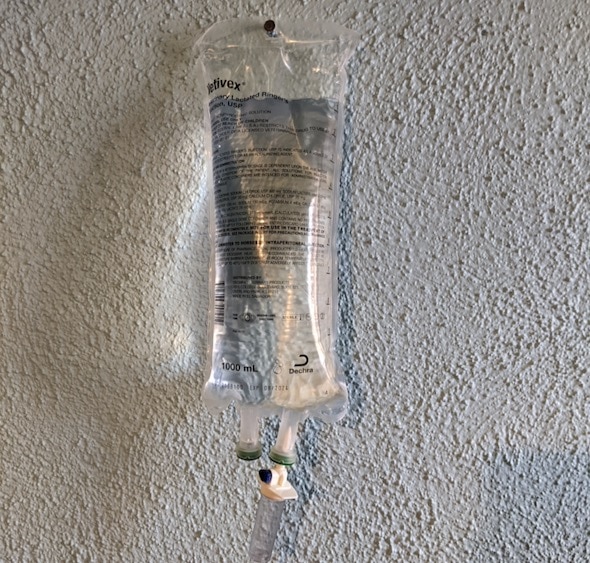
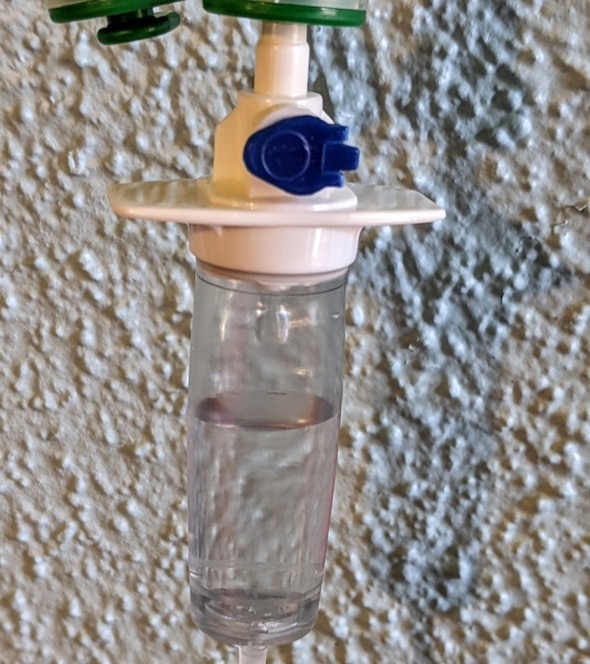
- Squeeze the bulb on the bag so it becomes a third to halfway full. This allows you to see how fast the fluids are dripping when you are later giving them to your pet. If it fills all the way to the top, hang the bag upside down and squeeze the bulb contents back into the bag. Turn the bag right side up and squeeze again until it a third to halfway full.
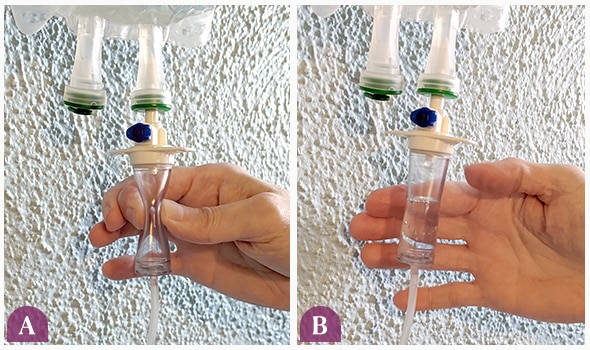
Squeeze the bulb (A) until it's a third to halfway full (B).
- Carefully uncap the tip at the end of the IV Line. DO NOT TOUCH IT TO ANY SURFACE. REPLACE THE IV LINE IF THE TIP TOUCHES ANYTHING.
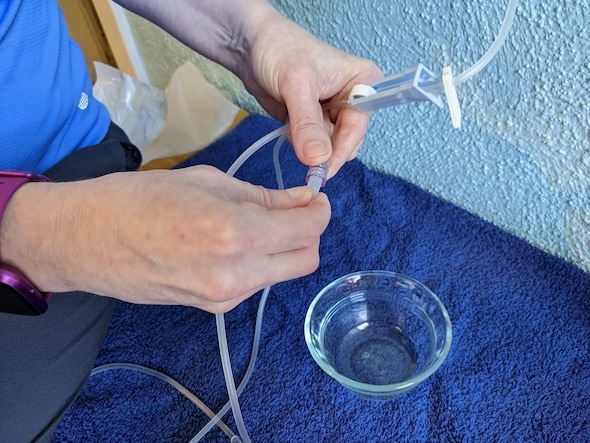
- While holding the end of the IV line over a sink or clean container, unclamp the line and let a small amount of fluid drip out until there is no air left in the line, just fluid. Then clamp the line again.

- Since the fluids are going under the skin instead of in a vein, small bubbles will not cause a problem here, as long as you have filled the line with fluid at the start.
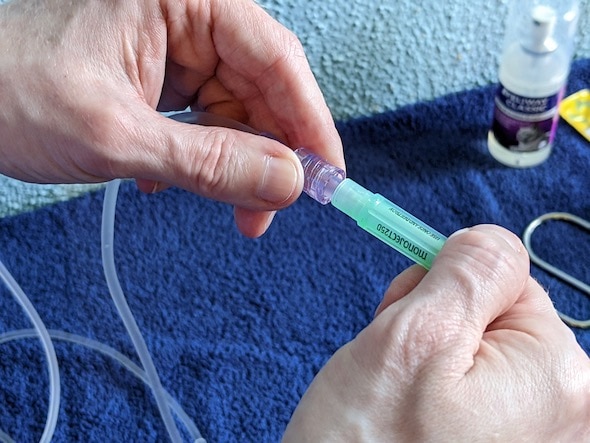
- Attach a brand-new needle to the end of the IV line.
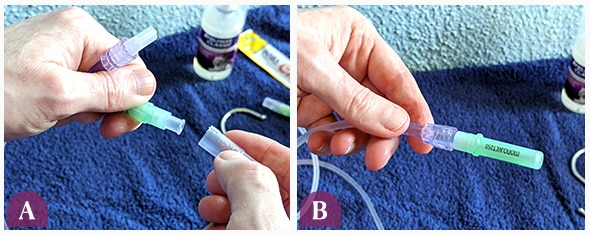
Take the cap off of the new needle (A) and attach it to the IV line (B).
- If needed, you can mark the amount needed to give on the fluid bag with a post-it or marker.
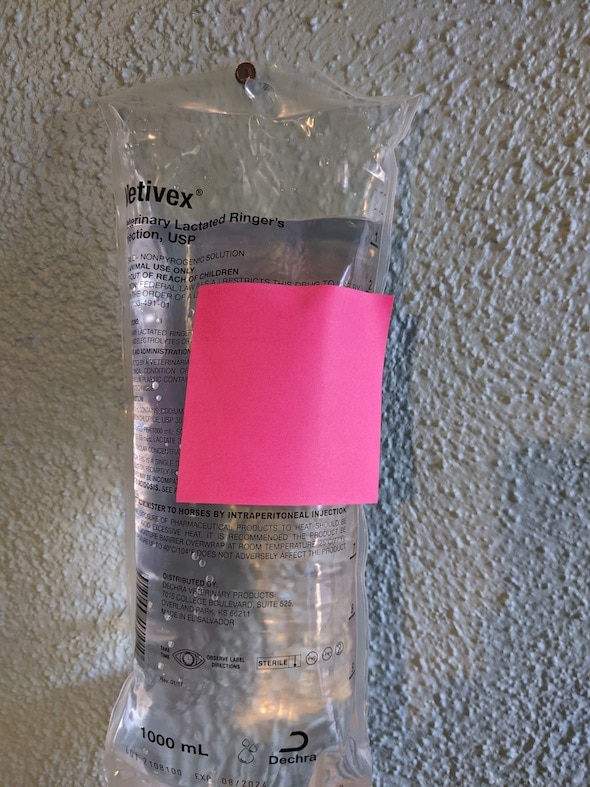
Now you are ready to give the fluids!
Giving the Fluids
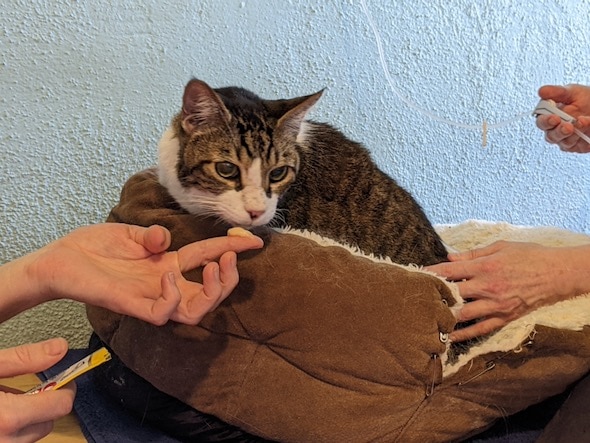
Most pets do best with minimal restraint. This means most helpers don’t need to be holding on to your pet, but instead need to distract your pet with something they like. In nauseated pets, food may not be a good distraction. Comforting, soothing talk, brushing, or calming pheromones sprayed on a towel will help.
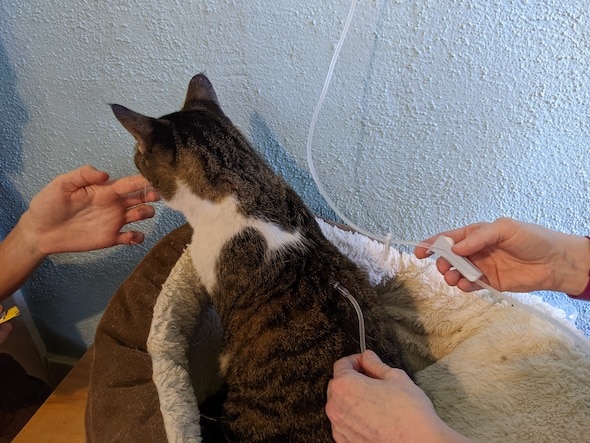
- The person giving the fluids will uncap the needle and pinch an area of skin over the back of the pet. The bevel of the needle (opening) should be facing up toward the ceiling. Direct the point of the needle into the center of the skin fold and open the clamp once the needle is inside the skin.
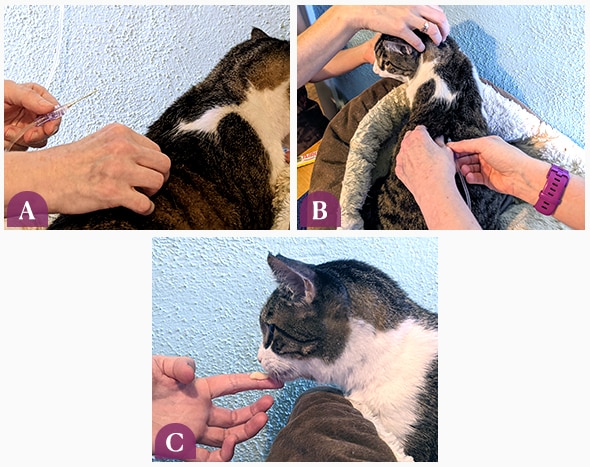
Gently pinch skin on the pet's back (A). Make sure the needle opening faces up and insert into the skin (B). Have the other person distract the pet with a treat (C).
- You should see fluid drops dripping in the bulb of the IV set.
- If the fluid drops are moving too slowly or not at all, you can adjust the needle slightly in one direction or another while keeping it under the skin to see if that increases the flow of fluid.
- If the needle has gone all the way through the skin and fluid is flowing through the other side, don’t worry. Just clamp the IV line. You and your pet may be a bit wet, but no damage has been done. If the needle has come out, replace it with a new needle and try again. If the needle is still in, pull it back toward you slightly, and unclamp the line to see if it is flowing normally.
- Depending on the amount of fluid needed, the process takes about 5-15 minutes for most pets. The area under the skin will bulge; this is normal.
- When the correct amount of fluids has been reached (up to the post-it note or marker line), clamp the IV line and remove the needle.
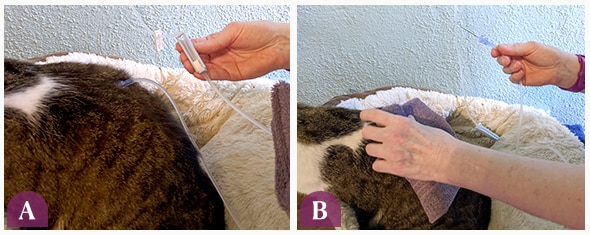
Clamp the line (A) and remove the needle. Place washcloth over the area and apply light pressure (B).
- You can pinch the area where the needle was removed and/or place a clean washcloth over the area, placing light pressure on it. A small amount of clear or blood-tinged fluid leaking from the site is normal and will stop within a few minutes.
- As soon as you are done, make sure to put a new needle on your IV set for next time. Well done!
Side Effects of Giving IV Fluids to Dogs and Cats
Pets should not be sluggish or lethargic after fluids. Here are some of the common side effects you may notice:
- Cats may hide if they were upset by the fluid administration. This is more common when you first start giving fluids, but they will usually stop doing this after a few sessions.
- Pets develop a noticeable bulge under the skin where the fluids are given. Over several hours, this bulge follows gravity and ends up on the lower part of the body (chest, abdomen, or belly, legs – depending on where the fluids were given). The swelling is temporary and should go away in 6-24 hours. Call your veterinarian if the skin bulge from the last dose is still present when the next dose of fluids is due. This may indicate that your pet is not absorbing the fluids at the expected rate.
- It is normal for pets to leak a small amount of the fluid that was given from the injection site. This fluid may be clear or blood-tinged. Pinching this area or placing gentle pressure with a gauze or clean cloth will help stop the flow of this fluid.
- Pets given subcutaneous fluids are expected to urinate more. No urination in 12 hours is a reason to call the vet.
- Some fluid types sting, such as PlasmaLyte A, 0.9% saline, or Normosol-R with pH of 7.4. These fluid types may be necessary for the pet’s medical condition. If the pet cannot tolerate the discomfort, talk to your vet about switching to intravenous fluid therapy at the clinic.
- Infection is uncommon, but call your vet if you see persistent redness, swelling, pain, or discharge (other than the temporary clear discharge expected after giving fluids) at the site where fluids were given.
- Vomiting is a possible but very rare side effect of subcutaneous fluid therapy.
- If your pet has any coughing or difficulty breathing that starts after subcutaneous fluid therapy, take them to the veterinarian immediately.
Troubleshooting
If you are having trouble with the flow of fluids, pets that will not stay still, or pets that run at the sight of the bag, try these helpful tips:
Fluids Are Not Flowing
- Make sure all the clamps are open. Make sure the tubing where the clamps were closed is round and not still flat. You can massage the tubing in these spots.
- Are the fluids raised high enough? You should have the fluids at least 2 feet above the pet.
- Adjust the needle slightly. Sometimes if the needle is flat against the skin, there is little to no flow. Adjustment may allow fluids to flow.
- If these fail, shut one of the clamps closed and remove the needle. Replace it with a new needle. Some needles are duds and don’t have an open hole. The fluids should flow through the new needle.
My Pet Will Not Stay Still
Try some of these tricks:
Small Pets
The between-the-knees technique (for able-bodied people): It is helpful here to have a very long IV set (105 inches). Kneel on the floor, placing the pet between your knees, with their head facing away from you. You can use your thighs to gently hold the pet in place while you administer the subcutaneous fluids.
The open-top carrier or open-box technique: Create a pet bed using a box without the top flaps. If your pet likes their top-opening carrier, this will also work. Fill the box with a soft blanket or towel and spray it with a pheromone spray about 30 minutes before you plan to do the fluids. The sides of the box should ideally be about 4-6 inches higher than the top of your pet’s head. The premise is that your pet will not get frightened by the sound of the fluids being prepared. Encourage your pet to use this as a regular bed. When it is time to give fluids, put your pet in the bed (if necessary) and lean over the pet (to prevent your pet from jumping out) while you administer the fluids.

Any Size Pets
Table or raised surface: Make sure that doing this is easy on you, too. Many pets do well when the pet is placed up on a table or higher surface, as long as they have a towel or mat with sure footing underneath. Ensure that the fluid bag is still 2+ feet higher than the pet when running.
Towel: Some cats would prefer not to see what is happening and would like a towel sprayed with pheromone spray (about 20-30 minutes before) over their head. Other cats prefer a loose swaddle, sometimes with a pheromone-sprayed washcloth or light cloth over their head.
Diversions: Cat and Dog TV! Do a YouTube search for cat or dog TV—there are plenty of options to try to divert your precious pet for 10-15 minutes while you are giving the fluids.
Treats: Dog-safe ice cream, tuna juice, tuna puree, Churu treats—save a special treat for fluids time!
Scratch trick: Scratch the skin before you insert the needle. This distracts the pet, and the needle stick is not so bad for either of you.
My Pet Runs As Soon I Get the Fluids Ready
Set up the fluid bag ahead of time and keep it hung in the place where you plan to give the fluids to your pet. This way, there are no sound or visual cues that the fluid time is coming. Instead, you can use this prep time to bond with your pet.
My Pet Doesn't Use a Full 1-Liter Bag in 5-7 Days, Before It Needs to Be Discarded
Ask your vet for smaller bags. Most fluid types, such as Lactated Ringer’s, come in 250 ml, 500 ml, and 1000 ml (1 Liter) sizes so that the fluids can always stay safe for your pet.
All photos provided by Dr. Jennifer Fryer